
Hi Everyone, This week I squeezed in a whole
afternoon in my sewing/craft room and today I want
to share with you one of the projects I got up to.
I decided it was time to freshen up my Ironing board
with a new cover. So today’s blog post is a
tutorial on how to make a ironing board cover.

What you'll need:
- Heavy/On the thick side Cotton Fabric
- Scissors
- Sewing Machine
- Elastic, I Used Recycled Elastic (you could also use a string or cord).
- Bobby Pin or Big Safety Pin
- Pins
 |
| Before Re-cover |
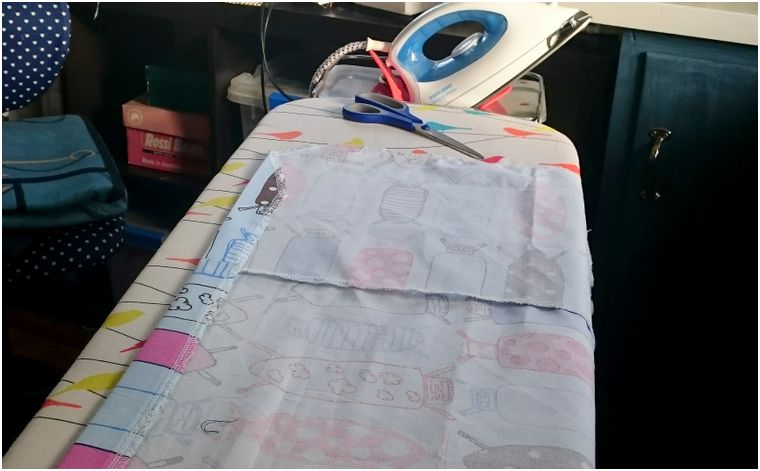
First thing I did was, Like usual, I pre ironed the fabric I wanted to
use, (I do this because it makes marking and working with the
I then laid out my fabric and placed my ironing board on top
so I could mark where I needed to cut giving me the size
and shape I for the new cover. I left approximately 10cm extra
around the actual ironing board shape to allow for a large hem
that I will thread my elastic through so the
cover fits nice and snug.
cover fits nice and snug.

I did not have enough length in the piece of fabric I wanted
to use so I ended up cutting some of it’s width off and re-joining it
creating a long piece, hence why my piece of fabric is not long
enough in the first photo.

I ran the whole piece of fabric through the over locker to ensure

I ran the whole piece of fabric through the over locker to ensure
the edges would not fray. You could simply use a zigzag stitch
instead if you don’t have a over locker.


I then folded over approx. 4cm all the way around creating a large
hem and ironed it down so it would stay in place. I them pinned
the hemline being very careful as I pinned around the corners
making sure I would be able to thread elastic through
this hemline later on. See Pictures!.


I them sewed the hemline in leaving a gap to thread the elastic in.

I them sewed the hemline in leaving a gap to thread the elastic in.


I like to save elastic so I can reuse it later on in projects and this
saved elastic comes in super handy in projects like this.!
I grabbed some elastic I have saved from underwear over
the years and sewed it together creating a nice long piece.

I pinned one end near the opening I left for threading the elastic

I pinned one end near the opening I left for threading the elastic
through and the other end I put a bobby pin in. I then threaded the
elastic through the hemline until it came out the other side.
Once I had it all the way through I tied the ends together and
trimmed off the extra length. I them hid the knot in the gap
left for threading it.


around so it is nice and wrinkle free on top.

Whoolah, It’s that simply.
I am super happy with my newer, fresher looking ironing board

Whoolah, It’s that simply.
I am super happy with my newer, fresher looking ironing board
cover and hope you enjoyed and was blessed by this tutorial.
God Bless

God Bless

Diy Project, Home making, house keeping, frugal living, stay at home daughter, money saving , homesteading, farm life, save without coupons, recycling, sewing, ironing board, tutorial, craft, fabric, how to, up-cycling, revamp, renovation, home decor, country living


9 comments
I love the saving elastic tip! Your iron board looks marvelous with it's new cover :)
ReplyDeleteI love the saving elastic tip! Your iron board looks marvelous with it's new cover :)
ReplyDeleteLove the fabric for your new ironing board cover. Great tutorial.
ReplyDeleteThanks for sharing at Happiness Is Homemade,
Bev
what did you use for the padding? How was it attached to the board?
ReplyDeleteHi Veggie Mom, So sorry it didn't reply sooner, i only just noticed your question.... So sorry..
DeleteI kept the original padded ironing board cover underneath my new one. Therefore I didn't need to add padding. I also made sure I used a heavy duty cotton fabric that would stand up to the heat of ironing. If you did not want to keep simply cover an old cover or you don't have one then you could use some quilt wadding and have it under the cover with a piece of heat resistant fabric like a good quality canvas between the padding/wadding and the cover so it doesn't melt or reuse an old wool planket as padding. Thank's again for your comment..Anita
Thank you for this lovely tutorial! I need to do this! :)
ReplyDeleteLove,
JES @ The Art of Home-Making Mondays
I've made 4 ironing board covers, very similarly to yours. But I used wide bias tape around it for the elastic to go into. It is nice to have different covers to the board. If one gets a spill on it, I just chuck it in the was and change to a clean one. And a change of look is fun too.
ReplyDeleteChanging out your ironing board cover sounds like a fun idea to mix up the day to day task of ironing .. Thanks for sharing
DeleteAnita
Hey friend, First I am thankful to you for your valuable and informative content. Your content is very useful for gather information about standing desks. Also, visit this website to read about miracle ironing board cover.
ReplyDelete